
I've been sharing a little bit of a new quilt project over on Instagram the last couple of weeks, and I've had a lot of people ask how I manage to applique the perfect circles I'm getting. So here's a tutorial.
You'll need three nifty tools, but more on that during the tutorial.

First tool is this - a packet of Mylar circle templates. Yes, you can use your own cardboard templates, but they have to be perfectly cut with no jagged, uneven edges, and they may get a little bit warped and soggy by the end of a quilt, so be prepared for that.. For this project I'm using both the biggest circle in the Big packet, and the biggest circle in the little packet. I freaking LOVE circles so none of the other sizes in the packets will be wasted and you can use them again and again.
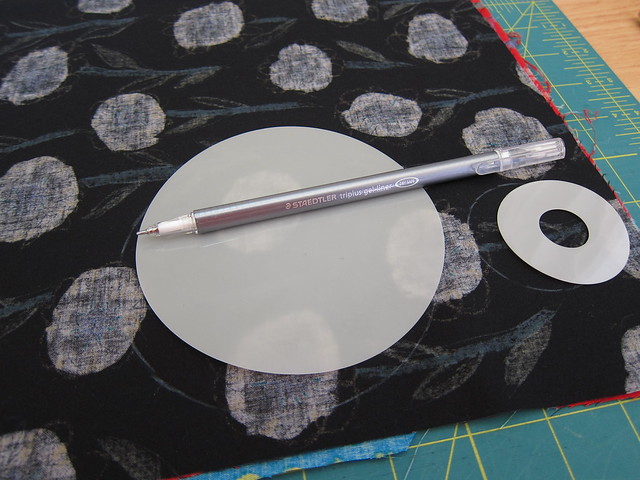
Select your template and trace the shape onto the back of fabric. Normally i use a pencil, but I'm out of leads so I'm using a white gel pen. It's on the inside of the fabric so no one will ever see it.
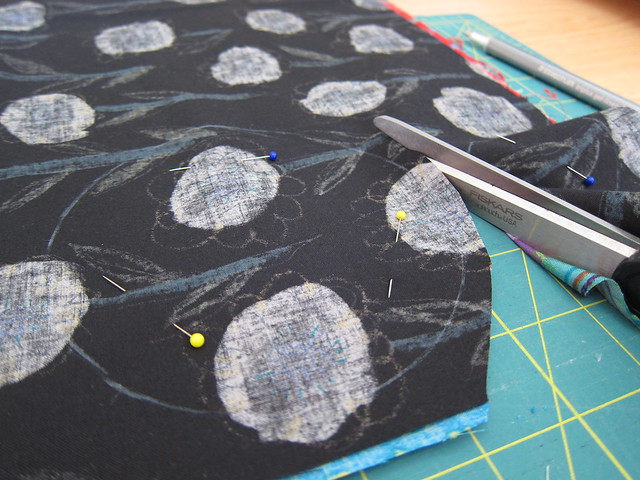
I do a few layers at a time - usually 4. I pin the layers together on the inside of the circle and trim to a suitable seam allowance. I probably make my seam allowance bigger than most - it's certainly over a 1/4 inch, but what you do is up to you.
Now it's time for a gather stitch. Make sure the tails of the gathering thread are on the right side of the fabric.You'll thank me later.
You can use the sewing machine on the largest stitch length if you like - I did the first part of my quilt that way but I found I was having too many thread breakages and frustrations with the 4 thread scenario. So now I hand baste. It takes me 2 minutes tops and I find it much faster when it comes to the next process.
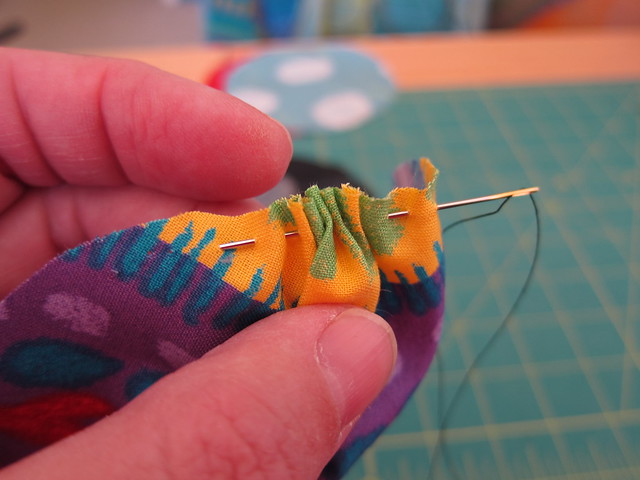
I use a big long sashiko needle and ordinary Gutermann cotton sewing thread and take many stitches at once. I usually can get a quarter of the circle on the needle before I pull the thread through. Make sure you are inside the seam allowance. You don't want to have those threads inside the circle line.
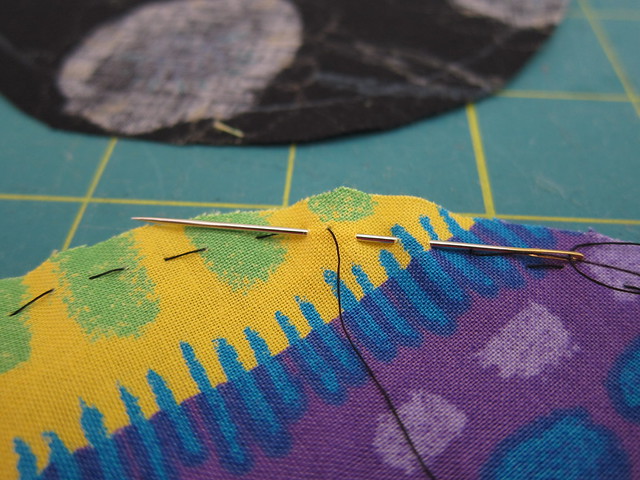
Finish the last stitch just past the first stitch, so they overlap.
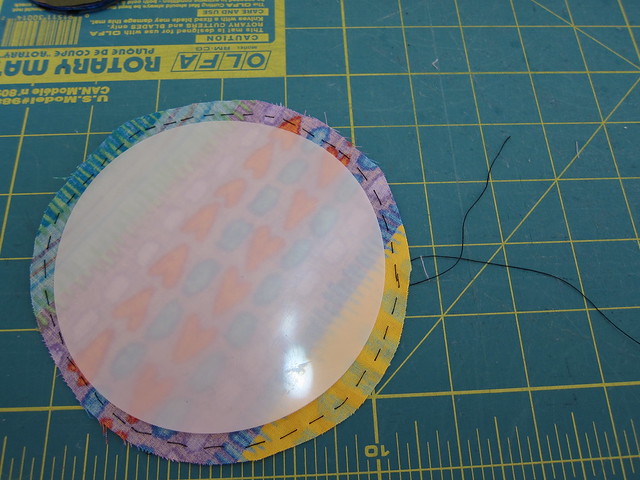
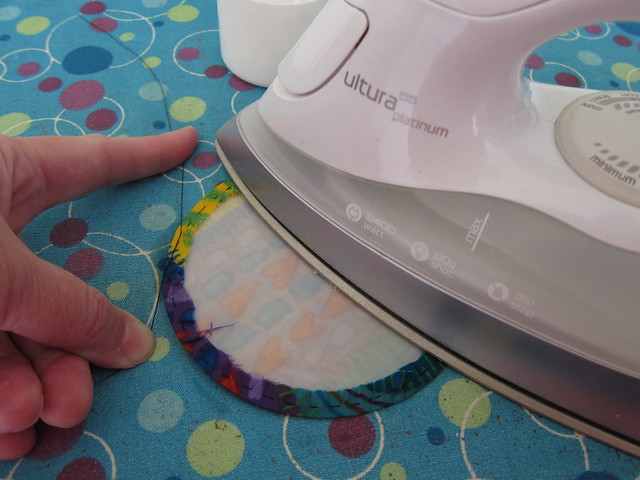
Now grab your template, put it on top of the wrong side of fabric.
Grab your gathering threads gently and pull (gently!) so the seam allowance comes over the side of the template. See what I'm getting at here?
Now take the whole shebang over to the ironing board. You can tie a single knot here if you like but it doesn't really matter, or make much of a difference. Not a double knot though - you need to be able to get that template out later and you won't want to cutting your gathering threads just yet.
Here's where tool number 2 comes into play.
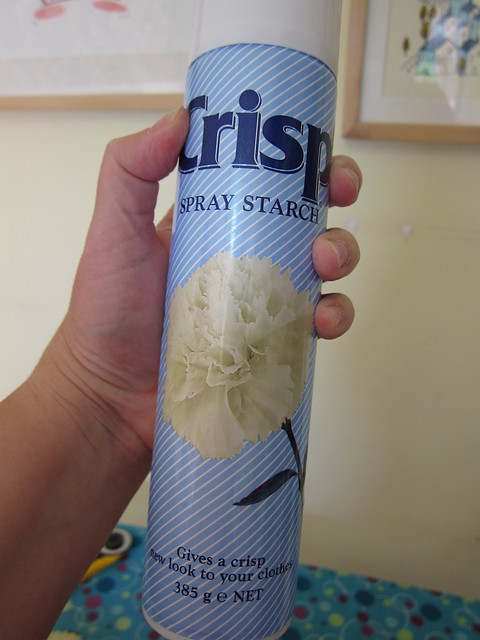
Yes, it's just Crisp spray starch from my local IGA. Shake it up, and spray an amount into the lid. And grab either a little paintbrush or a cotton bud.
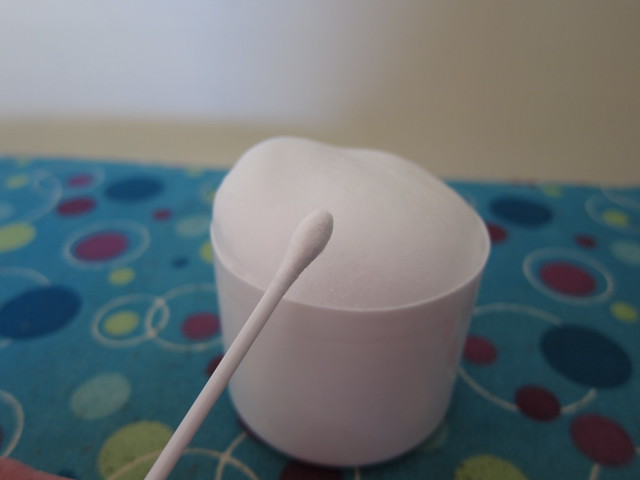
(I use a cotton bud because all my paintbrushes were sold at the trash and treasure a couple of months ago. Silly me.)

Hold onto the ends of your gathering thread tightly (but gently!) so the fabric is firm against the template, and start brushing on the starch. It doesn't matter if the foam has dissolved - just brush the liquid starch on to the edges until the fabric is soaked through, like so.
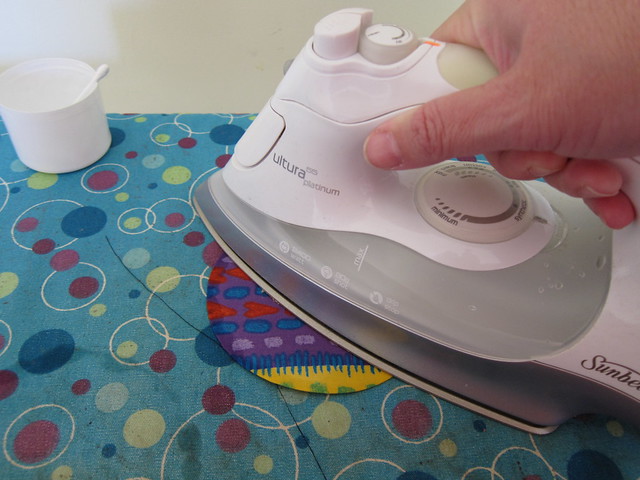
Then get your iron ready, but MAKE SURE YOUR IRON IS ONLY ON DRY MEDIUM HEAT.
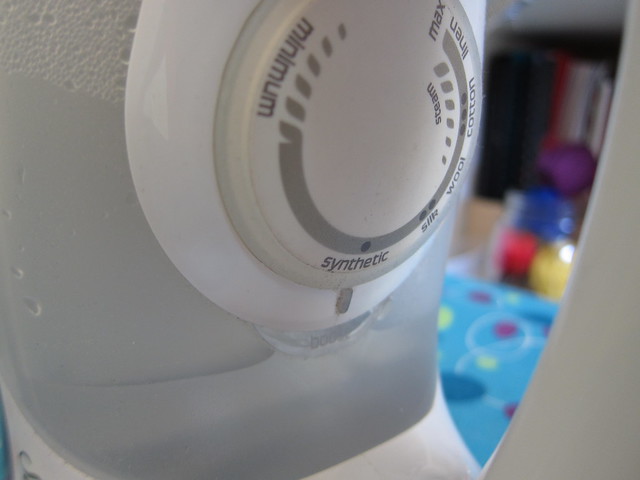
DON'T USE STEAM. DON'T TURN IT UP TO HIGH. Ask me sometime how I already managed to ruin one template already because I didn't read the instructions on the packet.
Gently press the edges until just damp. Don't move the iron around too much - you don't want the seam allowance to move. Just press down, lift, and move to the next starched spot.
Flip the circle over and press on the other side, until the fabric on that side is dry.
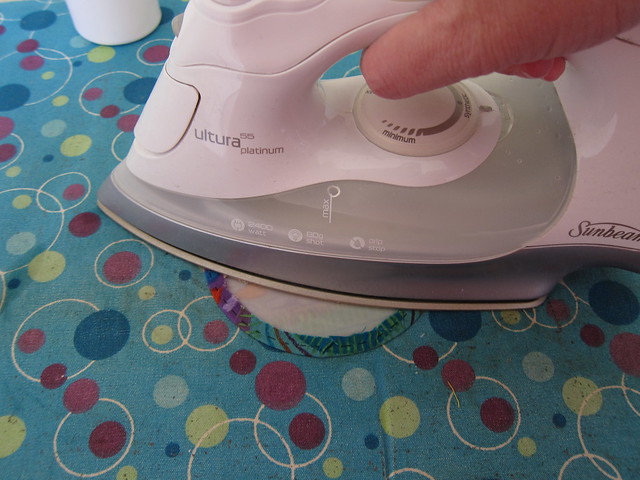
Flip it over again and do the underside one more time.

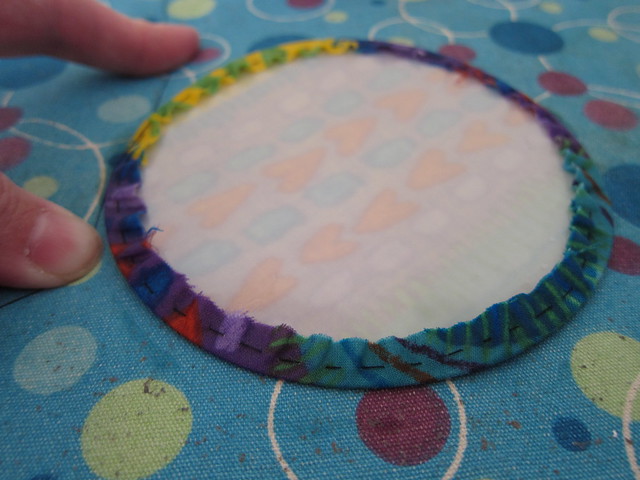
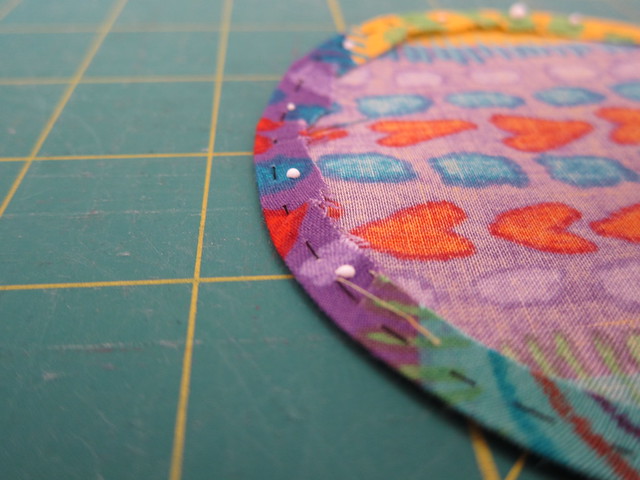
Wait until the template and the fabric are both cool. This is important. Then flick the gathering threads loose at the start (and end) of your stitching. And pull your template out gently.
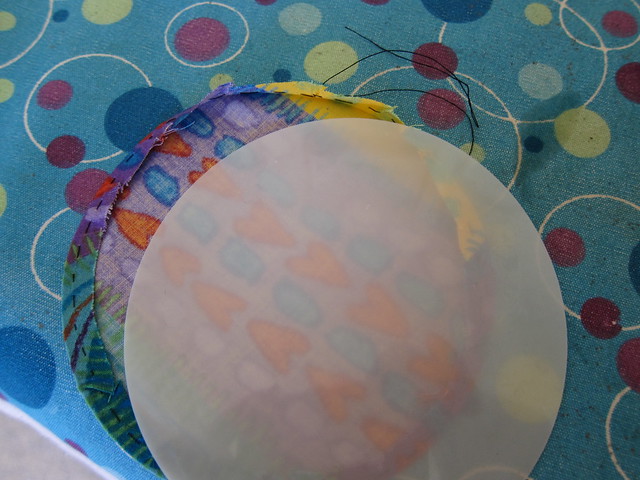
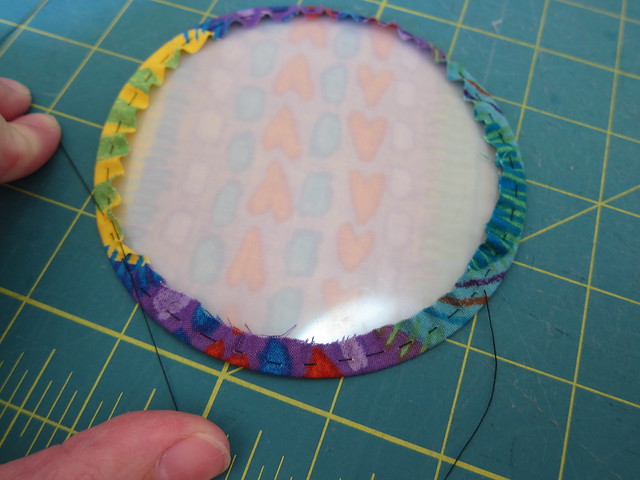
With the template out, go back and give your gathering threads a very gentle tightening again, so the circle sits flat. Too much tightening and you'll have a bulge in your applique. You should notice by now how lovely and stiff your edges are.
Go back and press it again, on top and under, until it is dry. You may notice a little watermarking and shine on your fabrics - don't be concerned. This is just the starch and will wash out.
Head back to your work space with your circle, and admire how bloody perfect it is.
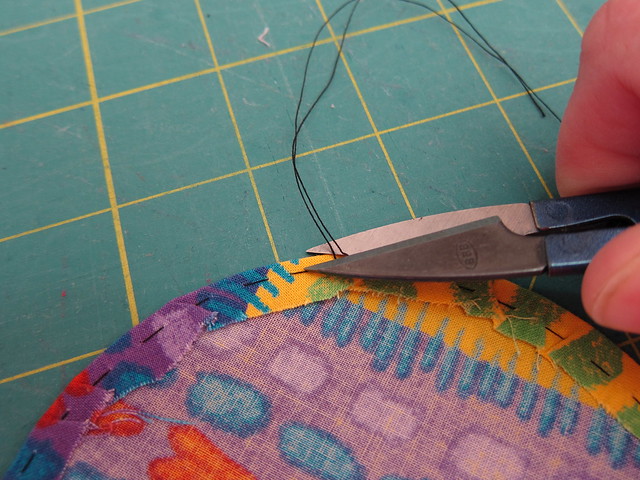
Trim the gathering thread tails. You can leave the gathering thread in.
And now for tool number 3.
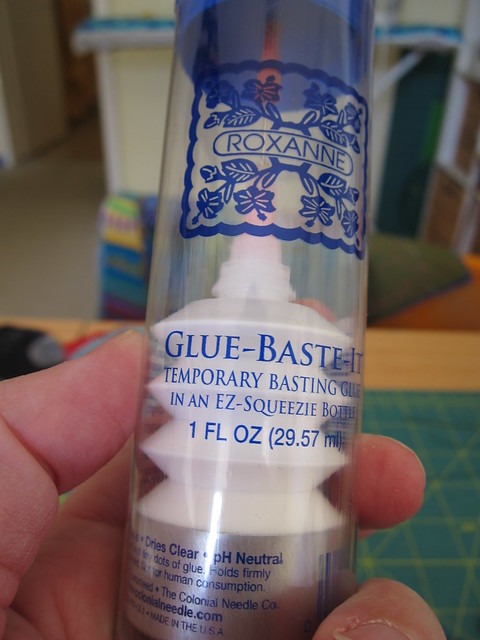
I use this basting glue because I couldn't get my applique pins to lay flat. Also this is a perfect portable project, and the less pins I have to deal with the better.
Dot a little teeny (TEENY!) bit of glue at periods around the circle, on the seam allowance.
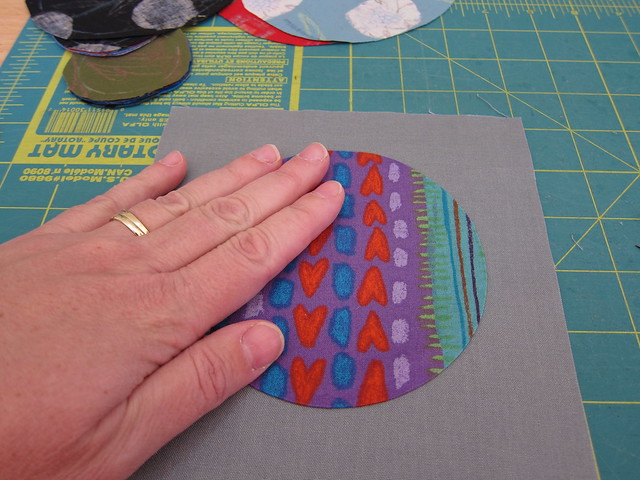
And then lay it on your background piece. Press flat with your hands. The glue dries pretty quickly, and you can start appliqueing pretty much straight away, or go and make a lot more perfect circles at the ironing board.
Here's how I do applique so it's almost invisible.
When I first learned to needleturn applique, fine silk thread reels were recommended to me. They just sink straight into the fabric. A few years later and those silk threads are getting harder to find in Canberra. I experimented with a few different brands - Gutermann silk, Superior Bottom Line poly, Aurifil 50/2 cotton - but none of them really hid in the fabric, and they were a bother to pull through the different layers most of the time.
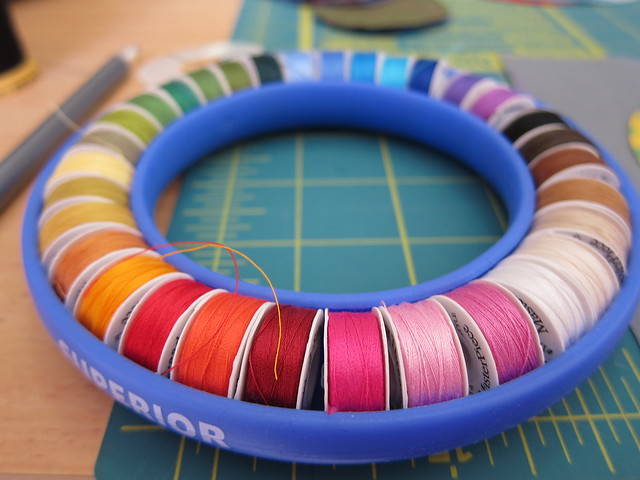
And then I discovered Superior Egyptian Cotton in the form of a Frosted Donut. Friends - this stuff is sensational to applique with! It sinks into the applique piece, is easy to pull through and comes in every imaginable colour.
Also. Donuts. And no, this is not a paid advert (I maintain an ad-free blog). I just really, really like this stuff.
So back to the invisible hand applique. Seriously, practice makes perfect. I can't emphasise this enough.
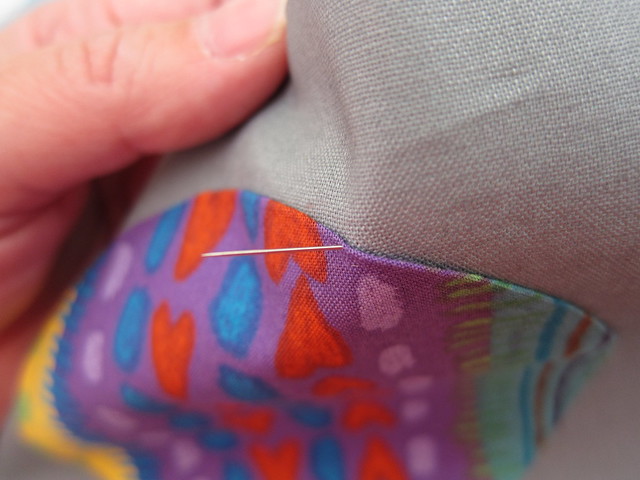
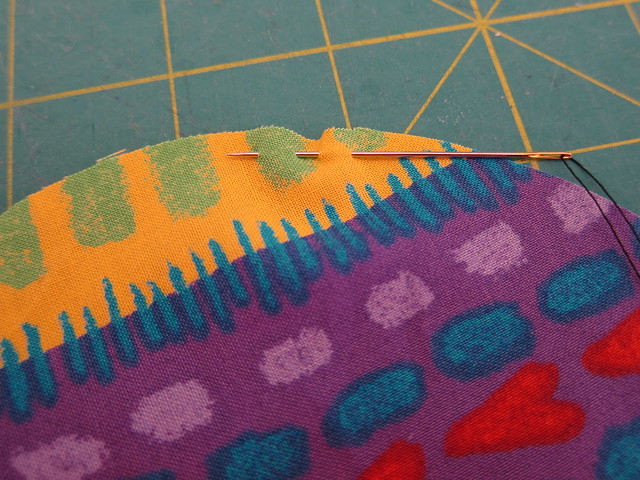
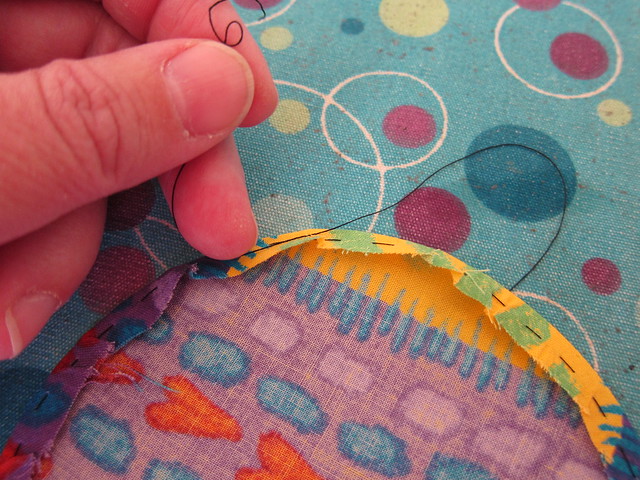
Knot your thread and start from the back. Catch only a couple of threads of the very outside of the circle. Pull your thread through.

Insert your needle directly behind where you just went, into the background fabric, and slightly under the applique piece. And then come back up through your applique piece again. Like the photo above.
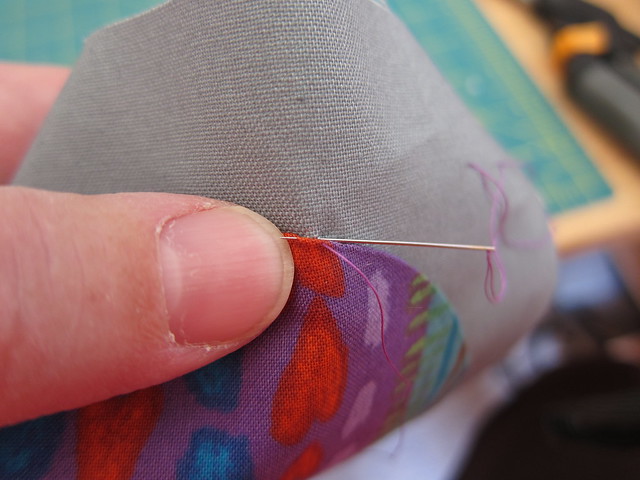
Here's another perspective. See how I've just caught a couple of threads on the edge of the circle? And how the needle has gone behind and under, into the background fabric? (See how much I desperately need a manicure?)
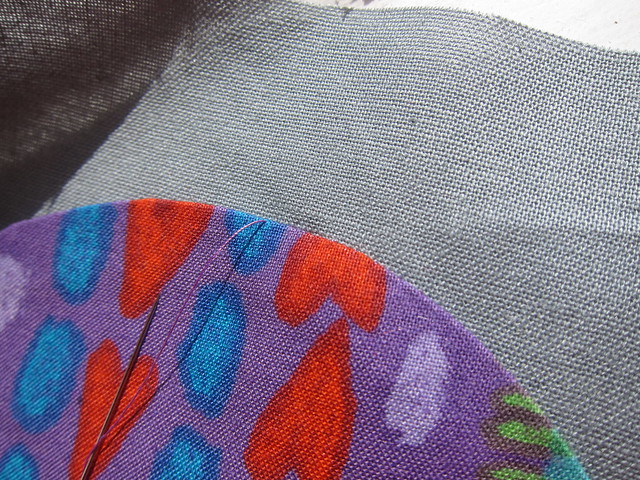
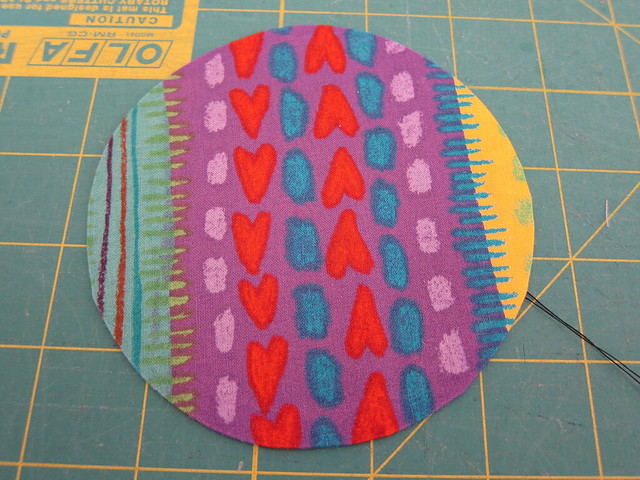
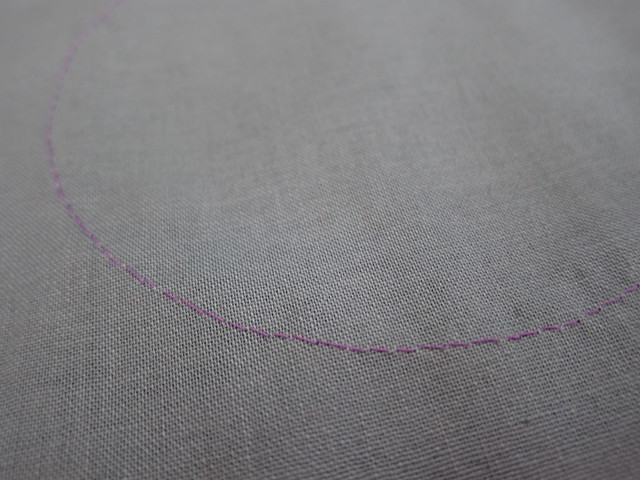
This photo was taken in the sunlight so you could see the first inch of stitching to the right of the needle. But you can't actually see the stitching. Clever huh? Like I said - practice.
Here's a different perspective again to show that first inch of stitching. You can only really see it from the sideof the piece. Of course the colour matched thread helps. But I also used this purple thread on the yellow and blue edges of the block, and you know what?
Can hardly see it.
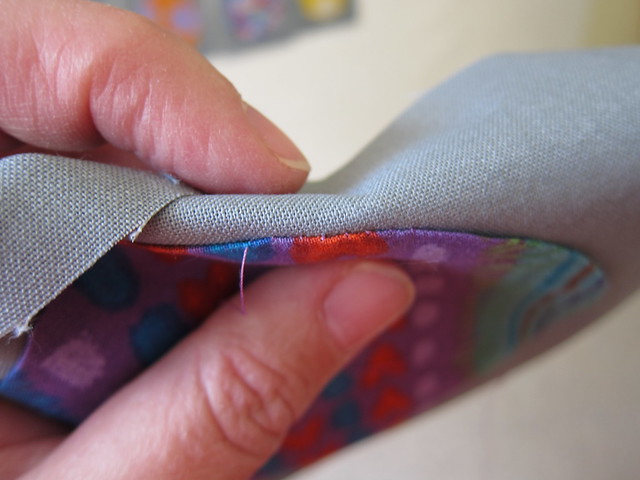
This is the back of the block. My stitches aren't too close together, and they aren't pulled super tight (otherwise you get puckering).
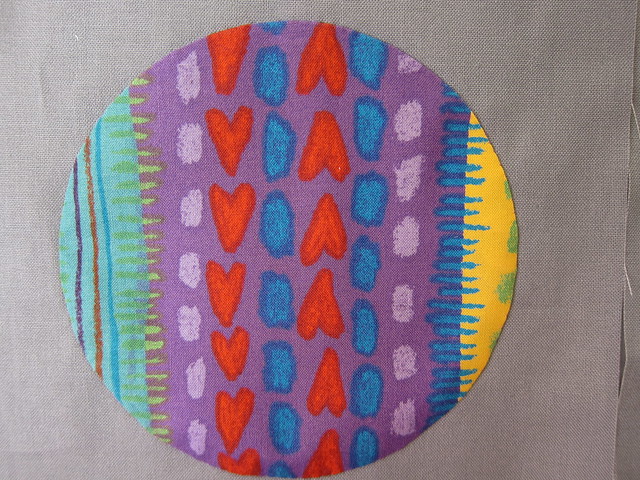
Each one of these blocks takes me 20 minutes tops. It's less than 10 minutes to cut out, do a gathering stitch by hand, starch and press, and attach to the background piece. Then it's another 10 minutes for the applique, but like I said I've been doing applique for a long time, and practice really does make perfect.
So what are you waiting for? Give it a go! And if you have any questions please ask in the comments and I'll answer there.
Right after I've given myself a manicure.
Thanks for the tutorial on perfect circle making. I have the package with the smaller circles and they work like a charm.
ReplyDeleteLove your circkle blocks, great fabrics!!
Thanks Nicolette! Love those circle packets. I think I know what I'm getting some quilty friends for Christmas!
DeleteThank you so much for this tutorial. Makes me want to applique circles right away. It's a pity about all the other stuff that really has to be done first, but next month for sure! Writing myself a note about the Mylar templates now!
ReplyDeleteYes next month! It's a lot of fun. Haven't gotten sick of them yet. And to be honest I think it's the perfect scrap buster project. Almost the appliqué version os hexagons!
DeleteYou're a genius. I'm gonna give that a go!
ReplyDeleteThank you! Not so much a genius - this info is already out there, but I just wanted to it all the techniques in the one spot.
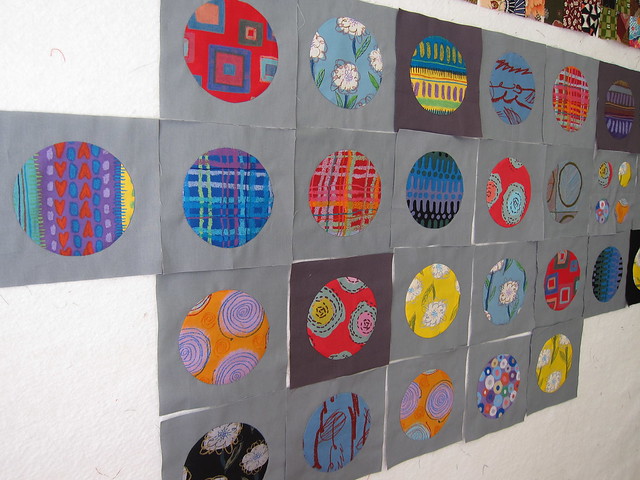
DeleteI like your design wall, freaking awesome. Looks like a lovely quick quilt to make and love the colouring..but I am rather partial to grey and yellow at the moment
ReplyDeleteOh man - I love my design wall! I never realised how much someone could love 2.4 metres of cotton batting ... Until I installed it in my sewing room.
DeleteI had always wanted to make a grey quilt with the the Koke Geiko fabrics and some circles - and I hate piecing curves so figures appliqué was the way to go.
Thanks!
ooh! i've been wondering how you get them looking so nice when i saw them on instagram!
ReplyDeleteyou make it look super easy!
thanks :D
It is super easy! I'm pretty lazy - I won't do things that are too difficult!
DeleteThat's a great tutorial, the only time consuming bit would have bee stopping and taking the photos and writing it haha, so thank you! It'll be bookmarked- I'm starting a Dresden baby quilt tomorrow, which will need some circles!
ReplyDeleteThanks Bec! Yep the photography slowed me down a little, especially doing everything with one hand! Can't wait to see your Dresden baby quilt! That's next on my list.
DeleteThanks for the tutorial. I use a cardboard template usually made out of old cereal boxes and usually cut out about 4 or 5 for a 20-25 circle project. Now I have seen the templates, I think they will be easier and less bother. I starch and do a gathering stitch, but had never thought to glue to my background (and I have fabric glue). Thanks for that little gem of information as that is what I am going to do from now on, instead of pinning. My stitching is very much like yours, so I am pleased to see that I am on the right track. Thanks for showing us how you do it and from now on my circle applique mantra is going to be: template, gather stitch, starch and glue; template, gather stitch, starch and glue......Cheers :)
ReplyDeleteThe templates are great - and you can wash them when they get too overloaded with starch. The glue was something I discovered on a Sarah Fielke video tutorial - I usually use the glue basting stick for hexagons but this stuff is a lot stronger and perfect for all the out-and-about stitching I do.
DeleteThanks Lisa!
Thanks for your brilliant tutorial - it's one of the best that I have seen. I usually use Daruma silk thread but don't have many colours, now I want one of those Superior donuts!!
ReplyDeleteAw thanks Carole! That's very sweet of you to say! I just wanted to out all those snippets of info that I've gleaned from other places in the one spot. Will be helpful when I love my memory and forget how to do this!
DeleteThe donuts are magnificent things. There is another shade donut in the Egyptian cotton too - the one I got had the brighter bolder colours I tend to use more, but the other one was maybe just a tad lighter. Bt when you've got that many colours to pick from any donut would do the job well I think.
Wow! That is amazing. My quilting most definitely isn't at that level yet. Your amazing!
ReplyDeleteThank you! But anyone can do this - I'm nothing special!
DeleteThank you for showing this! I want to go make some circles now! Sod the wedding!
ReplyDeleteNo no no no! Go and get married first and THEN you can do the circles!
DeleteDude! Your circles are AMAZING!! Thanks for the great tutorial =)
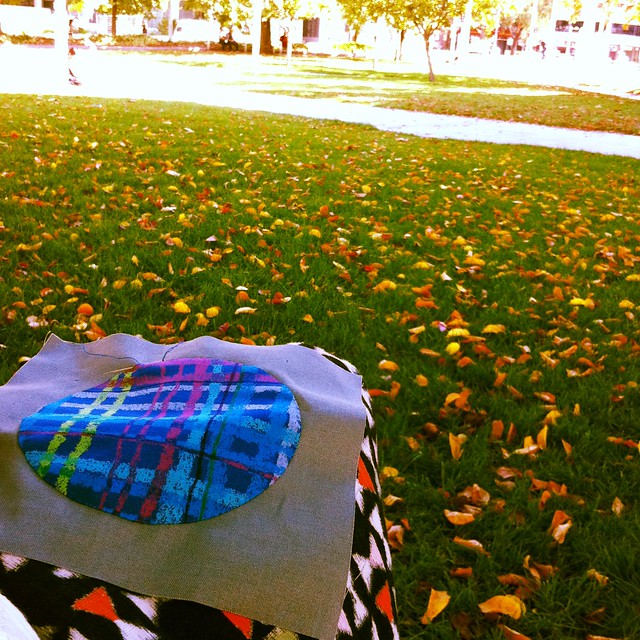
ReplyDeleteI love your autumn park photo too - so pretty! X
I freaking LOVE autumn!
DeleteYes!!! YES!! YES!!! You are absolutely bloody amazing, thanks for the tutorial!!!! I've been thinking about a circle quilt but I haven't been sure how to execute it.
ReplyDeleteI don't think this will be my last! It's so meditative and much more portable than hexagons even!
DeleteThanks so much for the tutorial! Those templates look like a must-have. I'm also intrigued by the donut (yummm, donuts....) of thread. I got a bunch of Mettler cottons in 50 wt back when I was doing applique 10+ years ago. I ran out of some thread and the LQS owner recommended a silk thread in 100 wt, and it's working well. I am going to try one of those donuts at some point, too! The silk concerns me just a little because it was the same LQS owner who had previously sold me cotton thread & said she doesn't like to use anything other than cottons in her quilts. Hmmm.
ReplyDeleteIf you can get a silk that sinks into the fabric I reckon that's great. I have a lot of quilt appliquéd in those silk threads and they are still going strong after a lot of bed use. But I couldn't get the silks in the colours I needed so jumped at the frosted donut!
DeleteThis is amazing. The effect is incredible. So clear and detailed and helpful. Thanks! Charlie.
ReplyDeleteIt was my pleasure! I had a lot of questions about it on Instagram so thought I should do a step by step. Besides it makes me really think about the process and whether I could do it any better/easier.
DeleteLoved this tute. I must get myself some of those circle templates and basting glue. Did you buy them locally?
ReplyDeletesuperb tutorial.. i love it. makes me want to try it someday..
ReplyDeleteGreat tutorial! Your circles are looking great. How do you plan to quilt these?
ReplyDeleteyou are very good. and funny. and i've been following you for ages on IG but i'm so glad i found your blog. now to figure out how to follow it closely!
ReplyDeleteI loved seeing your circles come together on IG. Thank you for sharing how you make them so neat. I am pinning this for another day, maybe soon-ish. I'll be looking for circle templates for sure.
ReplyDeleteMichelle, I can't thank you enough for your wonderful tutorial on turning perfect circles. The quilt I'm working on has eighty 7/8" berries. My first few berries looked more like sharp-edged rocks and I was getting a bit frazzled. I Googled turning circles and I found you. Now I have perfect little berries! You're a life saver. Thank you again, Terri
ReplyDeleteMy pleasure!!
Deletevery nice; thank you!
ReplyDeleteMichelle, you are a quilt saver!! I was struggling with circles for my wall hanging and am happy to pull off what terrible circles I have done, and follow your instructions.
ReplyDeleteRegards
Joy
That's great Joy! Thanks!
DeleteSo nice, thank you for sharing, Olga
ReplyDeleteThanks for sharing.God Bless You.
ReplyDeleteThank you for a great tutorial! x Teje
ReplyDeleteVery clever! Heading to the local quilt shop right now. Maybe they will have those circles.... maybe not, but I love going there. Coming home and working my first turned edge applique and it has 7 circles-- Wahoo!
ReplyDeleteNever got to the quilt shop--I called and they didn't carry the circles, so I improvised with washers found out in the shop (mine are around one inch). l have done 3 circles and they are perfect just as promised. Going to order the circles online because I know I will do lots of round applique. Thank you for teaching your technique!
ReplyDeleteHi Michelle, your tutorial is very clear and great photos. Thank you. Can you tell me what type and size and brand of needle you prefer please? The one in the photos looks a good length, but also very fine.
ReplyDeleteMany thanks
Marina
Hi again, I've just read some newer posts, including the most recent one, and there was the answer to my question. Clover Gold appliqué needles, size 10. Thank you, I'll look out for some.
ReplyDeleteCheers
Marina
Awesome tutorial and technique. Good read too! Thanks.
ReplyDeleteOMG! Came across this through Pintrest. Have been wondering for years how to do the hidden stitching! This is AWESOME!
ReplyDeleteThanks for your tutorial. I was fiddling with doing a circle quilt, and became quite frustrated. I searched the web and came upon your tutorial. You saved my life, well, my quilt's life. I'll definitely finish it now. And I love all your other tutorials with bits of information about equipment. You're inspirational.
ReplyDeleteThanks for sharing - you have encouraged me to have a go :)
ReplyDeleteThank you for de-mystifying quilt appliqué! Can’t wait to try this out. PS I just inherited a stash of vintage silk thread from my grandmother. Now I know what to use it for.....
ReplyDeleteI know this is an old blog post but this is such an excellent tutorial and has inspired me to use my huge stash of beautiful African fabric scraps - some are so choice and hold such memories.
ReplyDelete